


The success of any project relies on sweet, harmonious workflows and one of the most important ones to get right? Your approval process. This needs to be simple yet efficient to ensure quality and confidence in your work. If yours doesn’t sound like this, then you’re in the right place.
Today, we’re bringing you the ultimate guide to monday.com approvals. As you’re reading this, the chances are that you’re already using monday.com – but even if you’re not, we’ve still got a lot of approvals knowledge and expertise to share with you!
Whatever tools you’re using, if your approval processes aren’t up to scratch, your projects may come to a standstill. And nobody wants that.
So, if this sounds like you and your team, rejoice! We’re here to help with this complete guide to using monday.com for your approvals.
What is an approval process?
Let’s start with some background. (If you’re already familiar with approval processes, feel free to skip to the more specific monday.com sections, where we really dive into how you can set up your monday.com approvals process.)
We often describe approval processes as a series of checkpoints that a project, document, or a task must pass through to meet specific requirements before reaching its final point. The process acts as a safety net to ensure work is reviewed sufficiently and produces great-quality results.
A well-embedded approval process also minimizes bottlenecks and delays by streamlining the communication between individuals or departments responsible for granting approvals. Ultimately, an approval process safeguards the quality and compliance of project activities.
But, If your approvals process is unstructured, reliant on manual methods, or simply not fit for purpose, this can cause frustration for you and your team (and a big old hold-up for your work). We’re going to look at a few challenges that might result in a poor approval process next.
Common approvals process challenges
We have tons of experience helping teams create more effective workflows (did we mention we make brilliant apps?). During that time, we’ve seen organizations experience some of these common approval challenges:
- Tedious manual processes: Manual processes can be chaotic as they can involve time-consuming tasks to provide the data you need that can be time-consuming. This overall can impact project deadlines as you might have misinformed data.
- Relying on multiple tools and apps: Let’s say you’re using monday.com as your work OS (good choice! 🥳), but are managing your approvals using a different tool. If the two systems can’t integrate, you will face context switching, potential inaccuracies, and, almost undoubtedly, delays to your project’s progress.
- Communication and collaboration issues: Depending on the scope of your project or task, you could be working with stakeholders across your entire organization. If you have multiple approvers, often with their own workloads and priorities, it’s so important to make sure that communication is seamless. If you’re not using a fit-for-purpose approvals tool, however, effective collaboration becomes more and more challenging,
- Limited audit trail: It’s essential to maintain a clear audit trail for compliance and accountability. Using multiple tools (or, perhaps worse, no tools at all!) can result in the loss of approval history and actions taken.
When your review and approval cycles struggle to flow smoothly (or to get off the ground in the first place), they can cause a noticeable drop in productivity, project delays, and frustration for your team.
If this sounds like you, rest assured – we have some solutions for you in the following few sections!
Before that, we’re going to look at some of the benefits that a strong approvals process can deliver.
What are the benefits of an effective approvals process?
If you asked us what the secret sauce for project success is, we’d say accuracy, timeliness, and high-quality work. Now, a standardized approval process plays a fundamental role in achieving these goals. It keeps work flowing, ensures prime-quality output, and provides visibility for all stakeholders.
So, let’s dig a little deeper into the key benefits of an approvals process:
- Increased efficiency and productivity: An efficient approval process can boost your team’s productivity as it involves different stages to enable timely completion of tasks that will reduce delays, and manage resources effectively. (Spoiler alert: this is something you can achieve using monday.com’s native functionality and, to an even greater extent, using the Approvals for monday.com app. More on this later.)
- Better collaboration and communication: Clear approval processes enhance collaboration between team members, particularly if your entire process takes place within one, intuitive system (like monday.com, for example). With clear and well-maintained approvals workflows, your approvers and other stakeholders will have increased visibility of the status of work and can easily share information with one another.
- Improved compliance and adherence to policies: An enhanced approval process, when aligned with your organization’s review and approval procedures, can ensure greater compliance with relevant policies and regulations or accreditations. Approval processes can aid information security and data protection practices, as documents are subject to reviews, ensuring they are suitable for release or publication.
- Streamlined processes: Automated approvals can simplify workflows, allowing your team to focus on crucial business goals whilst remaining confident that work is progressing through the necessary approval steps.
So, those are just some of the benefits that an efficient approvals process can deliver for your team. But what kind of tool should you use to embed it? (This might not be too tricky to guess, given the title of this guide..)
Using a monday.com for your approvals
As we’ve mentioned already, to really benefit from a secure, collaborative, and efficient approvals process, you need to be managing everything in one place. In fact, studies indicate that a staggering 94% of businesses prefer to use a single automation platform rather than relying on various different tools.
So if you’re already using monday.com, it would be highly beneficial to manage your approvals process from within the platform too. With native functionality, trusted Marketplace apps, and a range of integrations, you should be able to embed centralized approvals with ease. You may have established some form of approval process already, but hopefully, we can still provide you with some extra tips, tricks, and tools you may not know about in today’s guide.
Now if you’re not using monday.com, (hello, pleased to meet you!), here’s a brief introduction to the platform:
monday.com is an intuitive tool for managing work that helps teams collaborate in one place. It’s trusted by over 125,000 organizations worldwide, and its automation features make project management efficient, effective, and enjoyable.
We’re big Monday.com fans here at AppFox, so we really do recommend the tool to your team if you’re considering a new work OS. It’s super intuitive and so feature-rich that we’d need another blog post to run through all its capabilities! (That’s why today we’re just sticking to approvals.)
Now we’re clear on the importance of using a single, unified platform, let’s start exploring some of those built-in features to help you set up an approvals process within monday.com.
How to manage your approval process in monday.com
If you want to make the most of monday.com’s native features for managing approvals, we recommend setting up a simple approval board. This way, you can keep track of everything in one place! Of course, you can always customize the board to meet your team’s specific and unique needs.
So, let’s get started. We’re going to outline the steps you can take to create a new, basic approval board using monday.com native features.
Create a new board
To create a clear overview of any approval processes in two steps, you should start by creating a new board on monday.com that is separate from your main working board space. Here’s how to do it:
Step 1: Click the ‘+’ icon on the left-hand side of your dashboard to create a new board.
Step 2: Customize the name of your board and what is being managed to reflect your approval process.
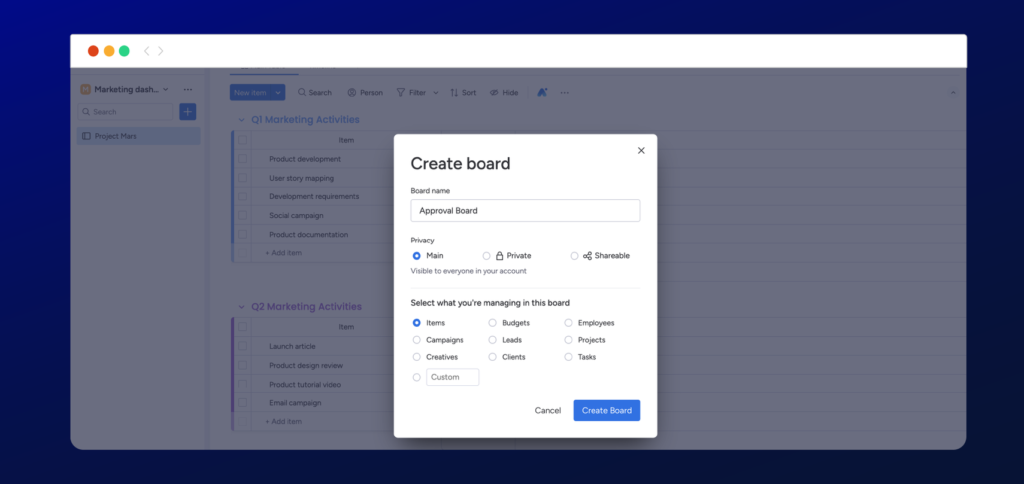
Your approval board is ready to customize! By using two groups within the board, let’s create an in-review and approved group to help manage and track the approval process.
Customize the approval board
To customize your board, we recommend following these simple steps:
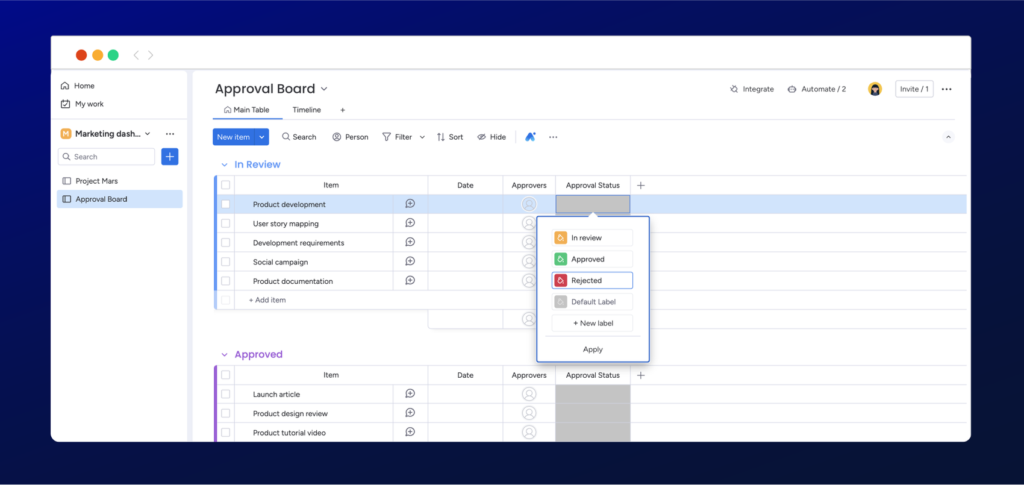
- Step 1: Start by customizing the board’s group titles to either show ‘in review’ or ‘tasks to review’ and an ‘approved’ group.
- Step 2: Customize the board columns to show the approvers, approval status, and timelines by clicking the ‘+’ button next to each row.
- Step 3: Go even further by changing the status labels to align with the approval progress by clicking on the label to show the drop-down list and clicking the pen icon to edit.
By customizing the board and the columns, you can easily visualize the progress of each item in your approval workflow, ensuring transparency and efficiency throughout the process.
Add automation rules
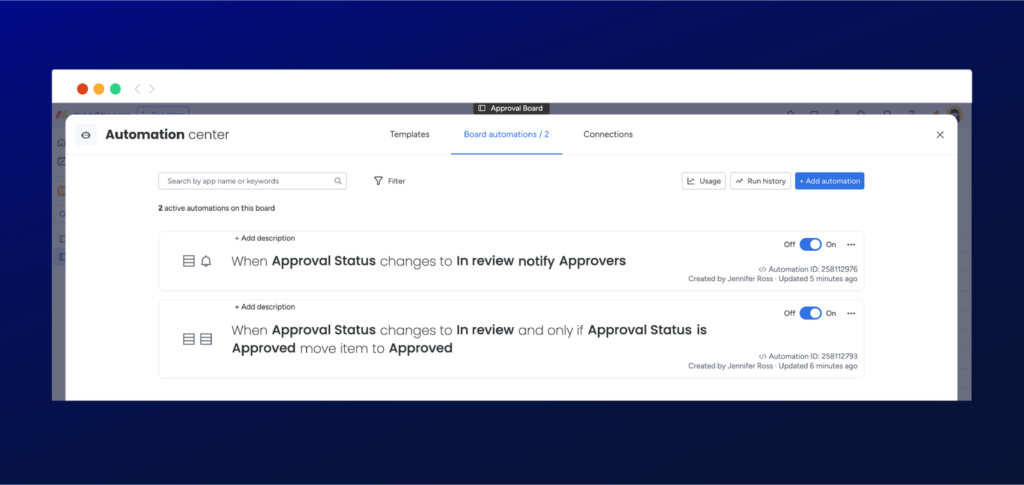
Finally, don’t forget that with monday.com , you can easily streamline the process further by using automation. One automation that we find useful is to move any approved items to another group as this makes sure your board is organized with no manual processes in place.
To add automation to your board, navigate to ‘Automate’ on the top left of your dashboard, where the display window will open. We recommend adding the three following automatons:
- When the approval status changes to review, this will notify the approver
- Once an item is approved, the item section will move to the approved group of the board
Now that we have set up an approval board and added automation to streamline your process, it’s time to test the board by setting up your first approval and approving an item.
Approve an item within your monday.com board
To approve an item, the approver can either click on the notification request in the app or in email, which will open the item for approval. Once opened, the approver can leave a comment and approve the item by changing the approval status label, where the item will move to the approved group of the board.
Creating an approval board will make managing your approvals a breeze in comparison to using manual processes. This system lets you easily track all the items that require your attention and apply some simple automation to save your team time and keep your work progressing forward.
Benefits and Limitations
Creating a dedicated board within monday.com to manage approvals can make the process much smoother, especially when working in a small team. But if you’re dealing with lots of different projects with multiple boards, that one board might not be enough to keep everything organized.
We’ve put together a list of three key benefits and limitations for you to consider in deciding whether this process is a good fit for you and your team.
Benefits:
- Track all approvals in one place: easily manage and track approvals within one dedicated board, eliminating the need to use other platforms.
- Simple to use: monday.coms’s user-friendly interface can help teams manage approvals with ease, even for non-technical members.
- Enhance the board with monday.com native features: You can customize your approval board to fit your workflow needs with monday.com’s automation rules, integrations, and custom columns.
Limitations:
- Time-consuming process: Creating a custom approval process can be time-consuming and take away from other important tasks.
- Ongoing improvements required: custom approval boards can require ongoing maintenance to keep them functioning for new projects.
- Scalability and adoption risks: custom approval boards may struggle to scale efficiently, and there can be challenges in getting all team members to adopt new processes.
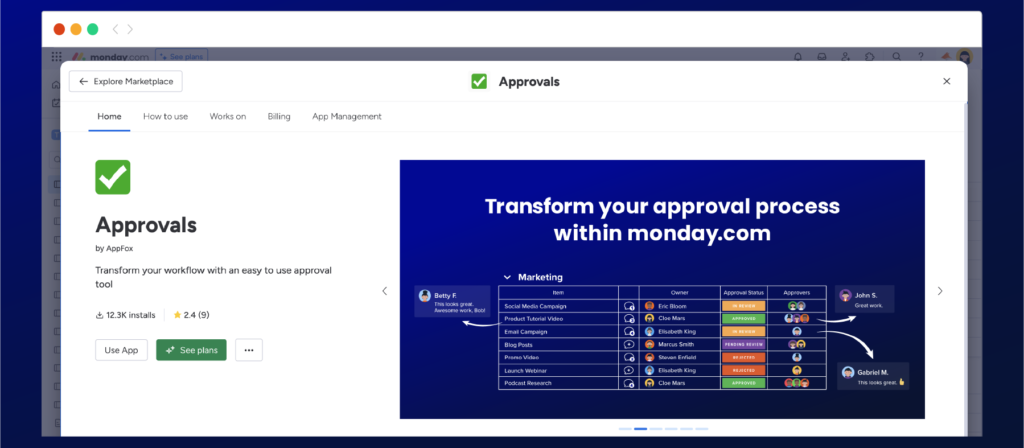
Using a bespoke app like Approvals for monday.com
You really can completely transform how the review and approval process is handled in monday.com with a tailor-made app like Approvals for monday.com.
In the following sections, we will guide you through:
- How to install Approvals for monday.com
- Setting up your first approval
- Requesting your first approval
- Approving an item
- Integrating automation with Approvals automation templates
How to install Approvals for monday.com
The good news is that adding power-ups to your monday.com board is quick and straightforward. You can install Approvals for monday.com within minutes with these three simple steps:
- Step 1 – Open your monday.com board, navigate to power-ups in the top right-hand corner to display a drop-down menu, and click Apps Marketplace.
- Step 2 – Once the App Marketplace display window opens, search for ‘Approvals’ and click on the Approvals app by AppFox (that’s us 😄 ).
- Step 3 – Once you are directed to the app listing, click use app.You can then choose which board you would like the app installed.
Using the Approvals for monday.com app
You really can transform your approval cycles with Approvals for monday.com. In the following sections, we will guide you through:
- How to install Approvals for monday.com
- Setting up your first approval
- Requesting your first approval
- Approving an item
- Integrating automation with Approvals automation templates
How to install Approvals for monday.com
The good news is that adding power-ups to your monday.com board is quick and straightforward. You can install Approvals for monday.com within minutes with these three simple steps:
- Step 1 – Open your monday.com board, navigate to power-ups in the top right-hand corner to display a drop-down menu, and click Apps Marketplace.
- Step 2 – Once the App Marketplace display window opens, search for ‘Approvals’ and click on the Approvals app by AppFox (that’s us 😄 ).
- Step 3 – Once you are directed to the app listing, click use app.You can then choose which board you would like the app installed.
That’s it! Approvals for monday.com is now installed – and you are ready to set up your first approval workflow.
How to set it up for the first time
Approvals offer a fully integrated approval process where you can add our default approval columns directly within your monday.com board. This will make it easier for all team members to track the progress of any approval directly from the board’s view.
Let’s add and customize the approval board columns to align with our approval workflow. Start customizing your board columns with these simple steps:
- Step 1 – Now that you’ve installed Approvals for monday.com, the app will display a Settings pop-up.
- Step 2 – Follow the settings on the pop-up and navigate to each drop-down menu. Click the +new column to customize the columns from the board view (or simply add the columns in the Approvals settings).
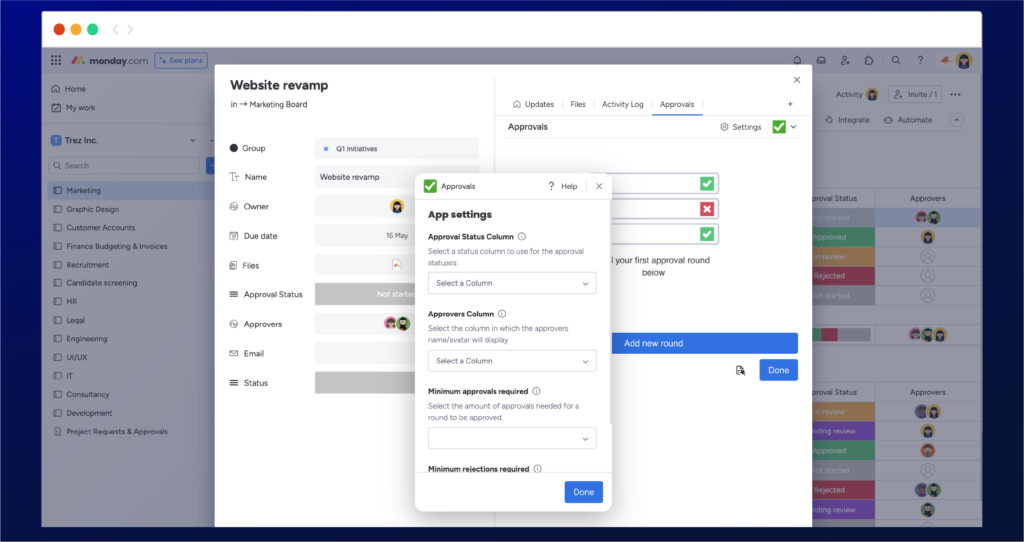
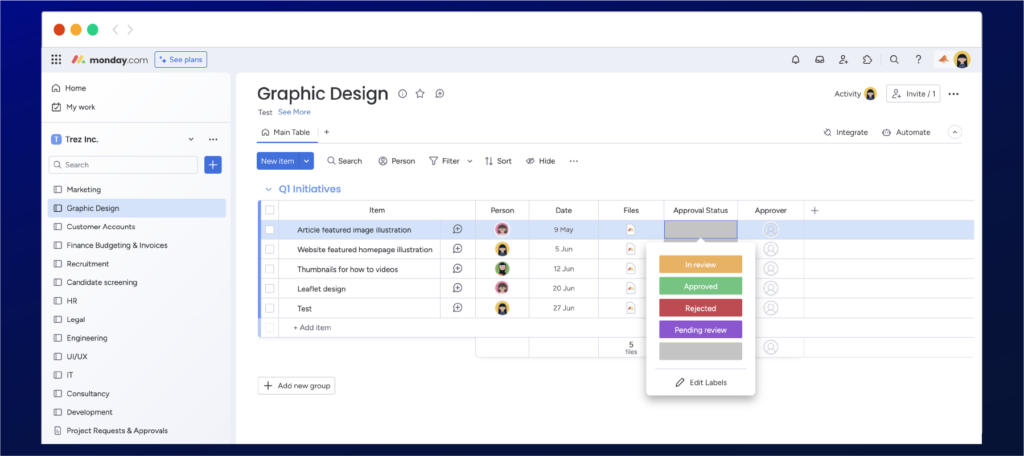
Customize the Approval columns.
The approval status columns will now be added to your board, where you can customize the column titles and the status labels. The video below shows you how in two simple steps:
- Step 1- We recommend customizing the title of the columns that will show the approval status and the approvers.
- Step 2: You have the option to customize the approval status labels to match the current stage of the approval process. To do this, simply click on the grey status box and select “edit labels”. We recommend including the following workflow: “in review”, “approved”, “rejected”, and “pending”.
You have now successfully added Approvals to your monday.com board, and now you can start adding your first approval.
How to request your first approval
By now, you’ve likely realized how straightforward Approvals for monday.com is to use. Whether installing it for the first time or adding your first approval, the process is pretty smooth and effortless.
Let’s explore the steps you need to start adding your first approval to any item on your monday.com board:
- Step 1: Lets get started by clicking on the item you want to approve, then click on Approvals at the top right corner of the item.
- Step 2: After opening the Approval app, click “add new round” to start the approval process.
- Step 3: Customize the title of your approval by clicking the pen icon next to the approval round title.
- Step 4: Next, add your approvers by typing or selecting the users in the ‘+add to add an approver’ field
- Step 5: The approval process is all set and you’ll see the status of your request listed as ‘Pending review’.
You have now successfully added Approvals to your monday.com board, and now you can start adding your first approval.
How to request your first approval
By now, you’ve likely realized how straightforward Approvals for monday.com is to use. Whether installing it for the first time or adding your first approval, the process is pretty smooth and effortless.
Let’s explore the steps you need to start adding your first approval to any item on your monday.com board:
- Step 1: Lets get started by clicking on the item you want to approve, then click on Approvals at the top right corner of the item.
- Step 2: After opening the Approval app, click “add new round” to start the approval process.
- Step 3: Customize the approval title and gain more control by clicking the pen icon next to the approval round title.
- Step 4: Next add your approvers by typing or selecting the users in the ‘+add to add an approver’ field
- Step 5: The approval process is all set and you’ll see the status of your request listed as ‘Pending review’.
Once an approval request has been completed, approvers will be notified in two ways:
- In-app notification: The bell icon on monday.com will notify if users are assigned to an item or are mentioned in any updates.
- Email notification: An email notification will be triggered when team members are assigned to an item or there are any updates, such as a reply to a comment.
From our perspective, these notifications are among the most essential elements of an effective approvals process. Adding approvals is simple, but ensuring your reviewers are notified quickly is more important to help them not waste time getting the item or task approved.
How to approve an item (or task)
Approvals for monday.com make reviewing and approving items simple, centralized, and efficient. You can send items for review, provide feedback, and approve work all in one place without switching apps.
To approve an item simply click on the approval request notification either by email or in monday.com, which will open the item with the approval and simply:
- Open the approval app and select the approval round to view your approval request and select approval decision.
- Now that you have made your decision, you will be able to leave approval feedback. Once you have done so, make sure you click Approve, which updates the overall approval status.
You’ve now approved an item. Simple right? Simplifying the reviewer’s job is crucial for efficient decision-making, reducing errors, and enhancing your workflow.
Benefit and Limitations
Approvals for monday.com is a great app that can streamline your approval process, but adding it may not be suitable for all companies due to existing processes or preferences for non-digital methods. Therefore, we have listed three benefits and limitations to using Approvals for monday.com.
Benefits
- Streamlined Approval Workflow: you can easily request, track, and manage approvals directly within the platform. This simplifies the approval process and keeps everything in one place.
- Customizable features: you will have the ability to customize approval workflows to suit your specific needs, with the flexibility to adapt the approval process to match your organization’s requirements.
- Enhanced Collaboration: team members can engage in discussions and actions related to approvals, improving communication in a centralized place.
Limitations
- Dependency on the app: if you heavily rely on a specific app for approvals and that app experiences downtime, it could disrupt your approval processes. It’s important to consider the app’s reliability and support.
- Lack of Synergy across teams: the app is great for collaboration, but if other teams don’t use the integration, it can lead to a lack of synergy and communication.
- Limited Features: While the app provides greater flexibility, it could lack advanced features found in specialized approval tools.
Now we’ve covered the essential app capabilities, it’s time to explore a little more. Let’s look at automation!
Automate your approval process
A research report asked workers which tasks they would most like to automate, and approvals made the top three. Of those who took part, 69% of workers believed that automating tasks like approvals would reduce wasted time. 66% thought it would eliminate human error, and 59% said that automation would recover hours lost to manual, repetitive tasks. The good news is that monday.com can help to banish productivity drains with its automation actions.
Today, we’ll focus on how automation can revolutionize your approval workflow in two key ways:
- Notifications: Once an item receives approval, you can automate notifications to relevant users or teams. This ensures that everyone is promptly informed and can take necessary actions.
- Workflow Automation: Use automation to send approved items to designated locations automatically. For example, you can set rules to move approved tasks from a ‘Pending’ column to a ‘Completed’ column or transfer data to another board for further processing.
How to automate your approval process
Integrating automation into your approval process can save time and improve productivity. monday.com’s automation features empower you and your team to optimize workflows and enhance collaboration.
We have put together the most useful monday.com automations that intertwine with the approval app so you can review and approve with more automation.
If you’re new to monday.com and want to automate your processes using our approval templates, follow these simple steps:
- Step 1: Access the Integrate option located on the right-hand side of the monday.com board.
- Step 2: When the display window opens, scroll down to apps and click into Approval automations
- Step 3: Once opened, choose from the ready-made automation recipes that best suit your needs.
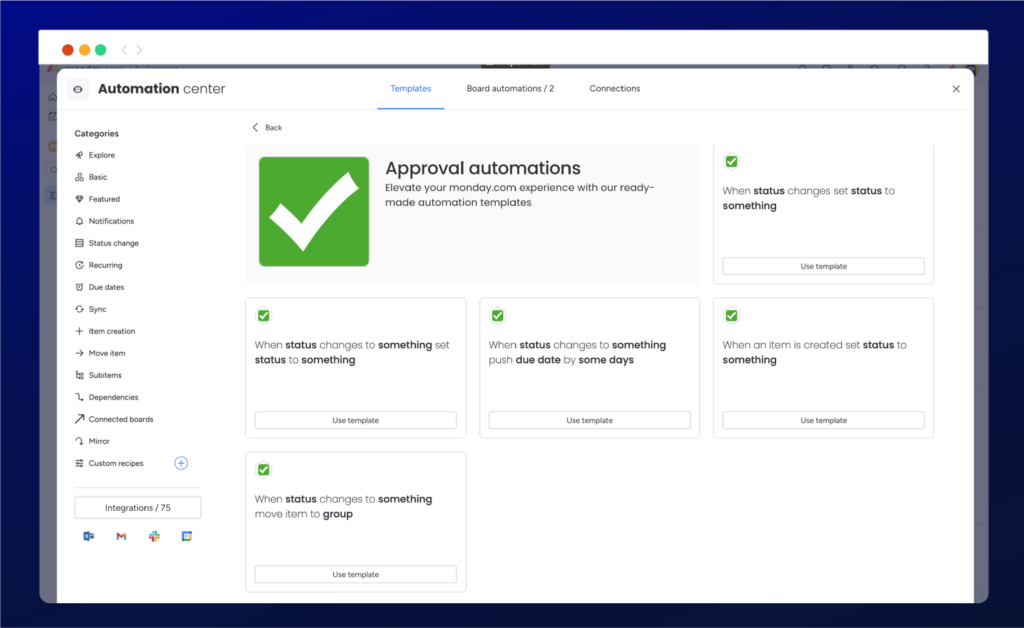
By following these steps, you’ll be well on your way to leveraging monday.com’s automation capabilities and optimizing your approval process efficiently.
monday.com forms
Do you use monday.com forms? You can also use our approval app to help you manage and review forms before sharing them externally.
Monday.com forms are an easy way to collect feedback on responses from job applications to work requests where you can easily organize the data in one place. We understand that before any form is sent or published, the same review and approval process must be in place to ensure your form is ready!
Using Approvals for monday.com with forms
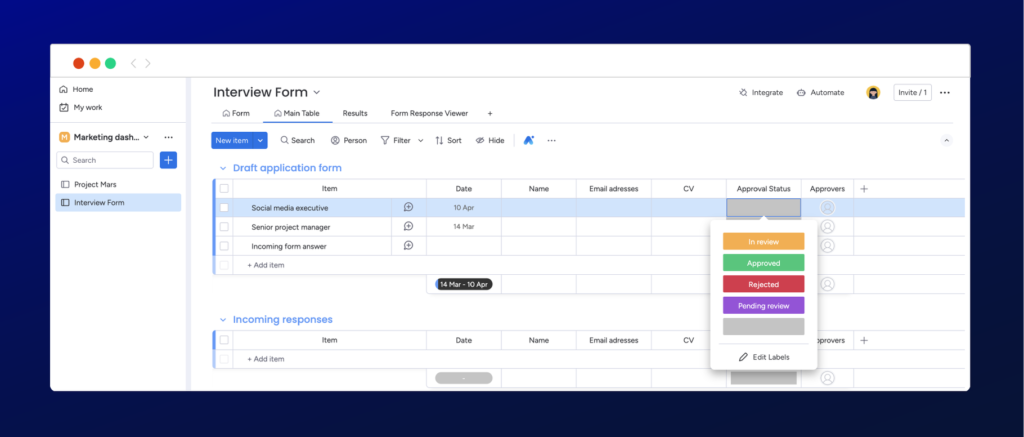
If you have draft forms waiting to be reviewed before making them public, let’s get your Approvals set up and running to make your process as seamless as possible by:
- Firstly, guide to your form location click in the main table tab, and click within any item.
- Once the item is opened, add Approvals through the items view center by clicking the plus button.
- Once the items view center has opened, navigate to your installed apps and select Approvals!
- Finally, add the default Approval columns and customize the columns to align with your approval process.
Before you start sending forms for approval, take it even further by adding approval columns to the main forms table, similar to adding the columns to your main workspace. Add approval columns in three simple steps:
- Step 1: Open any item on the main table and open the add view, where you can add Approvals within the installed section in the items view center.
- Step 2: We recommend customizing the titles of the columns that show the approval status and the approvers.
- Step 3: You can customize the approval status labels to match the current stage of the approval process. To do this, simply click on the grey status box and select “edit labels.” We recommend including the following workflows: “in review,” “approved,” “rejected,” and “pending.”
There you go! In a short amount of time, you can begin approving forms before submitting them for public release.
Conclusion
We hope that this has been the ultimate guide to approvals in monday.com and that you’re now feeling ready to set up your own workflows and start joining the hundreds of teams around the world benefitting from doing so, too!
It’s time to start approving documents simply, quickly, and efficiently. (And to perhaps enjoy an extra cup of coffee and a breather with all that extra time – and headspace – you’ll have.)
If you or your teammates would like help getting set up with Approvals for monday.com, one of our team members will happily walk you through it. Why not book a demo with us?